Tuesday, December 13, 2016

"Red"

Please Watch Before Reading!


Story Elements
Basically, this was a retelling of the classic story "Little Red Riding Hood", but in this case, a twist was added so that the wolf is actually a boy with a crush on Red Riding Hood. The whole story has a sweet tone to it, even when Red Riding Hood is being attacked, because even when she's in danger, the wolf boy is still there to protect her.


    For My Own Work...
    For my future projects, I would try to use character appeal similar to this one; I love drawing in styles like this. Also, it seemed pretty concise, which for me is difficult to do; I just get to detail oriented. I could definitely learn from this video in that sense.


      I Know
      It's kind of a given that if I wanted to make an animation I would have to give my characters...well, some character! Pretty much everybody knows how to do that. Other than that, as freshmen we learned about some of the basics of animation, like squash and stretch, and I could see some of these principles being used throughout this animation (squash and stretch, anticipation, appeal, etc.). We haven't gone into animating by hand in class, so I can't really say anything about that.


        Nice!
        The art style used in this is so cute! If I was the one who made this, I would be so proud of myself. Also, I really like that the creator left sketch marks on some of his frames, even though I don't usually like that. It just makes it seem cuter.


          Improvements
          Something that really bothered me while watching this was that there were sound effects for movements you would barely hear in real life. However, in moments like when the monster's horn was stuck in the tree, there was no noise at all; it just felt very unbalanced. Also, just for the record, I don't think that anything would still be alive (or at least uninjured) if they were thrown into a tree that brutally.


            As a Conclusion
            I'm a little nervous that this wouldn't be considered as a "professional animation" considering all of the film shorts I've seen, but considering this was made by just one person, I think it's pretty good.

            - Brenna (• ◡•)


              Red. Dir. Hyunjoo Song. YouTube. N.p., 29 June 2010. Web. 12 Dec. 2016.

              Monday, December 12, 2016

              How to Use the Puppet Tool


              What is the Puppet Tool?
              The "puppet tool" used in the program AfterEffects helps to make whatever you're animating come alive. This tool allows you to create a mesh on your character so that you can more fluidly animate it. I was too embarrassed to ask for help with it when my class was still frequently using AfterEffects, so it took me a long time before I actually learned what it was. This tutorial is for anyone who's interested in learning about AfterEffects and might be having trouble figuring out what to do.

              What to Do

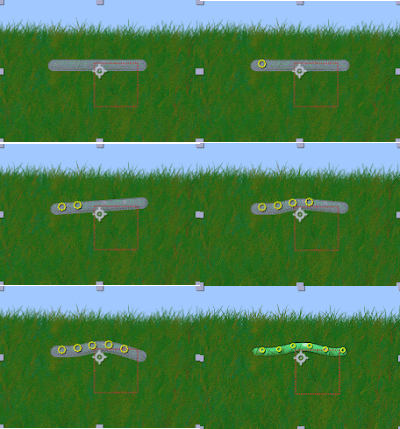
              1. To start off, you need to select the Puppet Pin tool, which is in the upper left-hand corner of the screen.
              2. After it's been selected, put as few pins on each separate layer of you character as you can, but don't put too few.
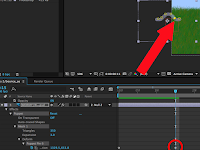
              3. That last step was the easiest. Now, it's time for the hardest part. At the bottom of the screen is the animation timeline. On the left side is your layers, which includes your character. Under one of your character layers, choose Effects > Puppet > Mesh # > Deform > Puppet Pin #. Create a point in your timeline, then drag the time indicator to another point in the timeline and move a pinpoint on the screen. If you press play, you'll be able to see it move!
              Just In Case You Need Some Pictures


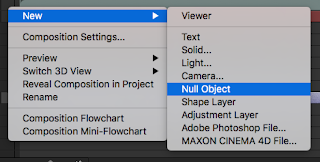
              Step 1: Put the pinpoints Bonus(?) Step: Add a Null Object to the
              on the object. object you're animating if you want it to
              move across the screen.


              Step 2: Create a keyframe in Step 3: Move the pinpoint
              one spot. into a different position &
              create a new keyframe.
              After you've made several keyframes, animate it!

              Sorry it's bad, but I hope you get the point.
              Helpful Websites (Maybe)

              - Brenna (• ◡•)

              Tuesday, December 6, 2016

              Ice Cream Animation

              Generally,
              Our job for this project was to create an ice cream "shop" where an ice cream cone, bowl, and a scoop would be rotating on a Lazy Susan.

              The Process
              Our first priority was to create the stars of the animation, the cone, bowl, and scoop. Afterwards, we had to use Blinns and Lamberts to color everything BUT the ice cream, but I didn't get the message until later, so I didn't change anything haha...Anyways, we then had to put a backlight, a fill light, and a key light into the frame, including shadows. Unfortunately, many shadows wouldn't show up, and I couldn't figure out how to get them to. Lastly, we had to render out 120 frames of the Lazy Susan spinning and make it into a GIF/video.

              What I Learned
              In technical terms, I learned how to group and rotate objects in Maya, along with rendering several frames out all at once.
              Professionally, I learned that I STILL need to get over my personal pride and ask people for help if I can't figure out what to do. I'm getting better at it, but I still need to work on it.

              Should Be Different
              Instead of just leaving it the way it was, I should have made more divisions in the Lazy Susan so that it didn't have edges. I also should have used the cloud thing (???) on my ice cream instead of just picking up images off of Google. Along with that, I should have worked harder to find out what was going on with my shadows.

              It's Fine the Way It Is
              I'm actually pretty proud of show smooth the animation is, except for a barely noticeable stop when it loops, but other than that I think it's pretty good.

              Past Experiences ➡ Future Betterment
              I know I should have taken more notes on certain procedures in Maya, but some like pressing "R" for the timeline to show up is something that I will definitely remember. I think it will be especially helpful since we pretty much know the basics of animation and won't just be making stills anymore.

              Just Letting You Know...
              Even though I already have the GIF on here, I would really appreciate it if you could watch the video too, please (it has music ♪)!


              - Brenna (• ◡•)

              Thursday, November 10, 2016

              Story Animation


              Our Job
              For this project, we had to create a short animated story [that I didn't finish]. We had to incorporate what we learned in both Photoshop and After Effects into it.

              Making It
              The first objective we had for this project was to make a storyboard, then edit it along the way according to our needs.
              Making characters and sceneries was our next priority, whether we created them by a program or by sketch (both for me). Certain parts of its body had to be separate from the other parts in order for it to move smoothly in After Effects. For our background, we once again had to make multiple layers for a better feel of movement.
              After finishing those, we had to add everything into After Effects, finally making our story.

              Improvements
              Along the way, I finally learned how to use the puppet tool (to move the ant's legs), which I couldn't figure out before and was too stuck up to ask about.
              In my work environment, I learned that if I want to get things done, I have to ignore my friends' conversations as much as possible, unless of course it had to do with making my animation better.

              Doing Things Differently
              If I had the chance to do this again, I would probably do it somewhere where I could easily focus on what I was working on, someplace quiet. I also would have tried to divide my time up equally so I could focus on one aspect of the project at a time.

              I Wouldn't Change...
              My story. Ants are really cute and I kind of think the story I made for this was cute too...

              Learn From the Past
              For the next project that I work on, I will try to talk to my friends less and make more time for myself after school if I'm having trouble managing my project.

              Lastly...
              I'm sorry that I didn't finish this. It may sound like an excuse, but I really am a very slow worker and I didn't have the resources or very much time after and outside of school to really work on it. I will try my best to finish it outside of class! ◔̯◔

              - Brenna (• ◡•)

              Monday, October 31, 2016

              Scenery Animation

              Creating an Environment
              For this project, we got to create a scenery of our choice, and make it pan across the screen. I decided to go with a beach at night, creating a lonely and colorful scene for the viewer. Sadly, we had to use Photoshop to make it, which was pretty hard, but at least it turned out pretty well. It may be pretty dark, but below ⬇ is all my layers put together.

              How It Works
              To create a moving environment like the ones frequently used in old cartoons, you need to create several layers without merging them ever (well, unless you just want to show a picture of it??). You just need to make the layers closest to the viewer shorter, farthest (except sky) longer, and the sky doesn't move at all. Characters don't apply to these rules!

              Using After Effects
              Putting this into After Effects...was actually pretty simple; it didn't take that long at all. All you really have to do with an animation like this is to pinpoint it at whichever side you're starting at, then pinpoint it at the farthest point on the other side. Sorry if that doesn't make sense lol.


              - Brenna (• ◡•)

              Friday, October 28, 2016

              Walk Cycle

              Drawing It Out
              In early September, we started with our walk cycle project. Our first task for it was to draw out body parts for a particular character and then outline them in Sharpie (I made a sexy astronaut :>). Afterwards, we had to scan in the sheet of paper to single out the body parts and give them color if we wanted to.

              It's Alive!
              When we had our character(s) and background ready, we then uploaded the files into After Effects where we had the character move across the screen. Although we were supposed to use the puppet tool to make the movements more realistic, I couldn't figure it out, so I just made my astronaut march instead (special guest star: extraterrestrial).

              - Brenna (• ◡•)

              Starter Animations

              Sorry in Advance
              I will be uploading a few projects within the next day or so that I meant to put on here a month or two ago, but I've just been really busy and haven't gotten around to it. This is one of them!

              Bouncing Ball
              Our first project was to create a bouncing ball, even though we had already done that as freshmen. It was fairly simple, but we used a different technique that we did last year. This time, we used After Effects instead of doing it manually in Photoshop.


              Inchworm
              Using basically the same scenery we used in the bouncing ball animation, we had to create an inchworm, and, using After Effects again, have it inch its way along the screen. We could make the worm look like anything we want, so I made mine look like Wormy from Spongebob :>.
              (Sorry this is pretty bad)

              - Brenna (• ◡•)